Tuesday 31 January 2012

Illustration Friday -- Forward

Well hello there blogging community, so good to see you again. This week's illustration word is forward. I'm really excited for it because 'forward' has the potential to be very poetic, and I'm just that kinda girl! This week I'm taking my inspiration from Walter Wyles. This image has a monochromatic feel, but the focal point is in contrasting tones. The main scheme is cool blues and the focus is in warm orange tones.


These are the concepts I've come up with. My interpretations of the word went from, Fast Forward, to Pay it Forward, to No way but forward, then finally pushing/moving forward. The concept I'm going to continue with is the one on the second row, first on the left. I was listening to Snow Patrol's "Lifeboats" and it made me think that sometimes life gets rough and scary and sometimes you need to swim out farther in it to get to safety. You have to push into the heart of the problem before you can fix it or ride out the storm.

To incorporate Wyles' style I'm going to use a monochromatic blue harmony but have the Life Preserver a contrasting orange. I'm also going to use a wash effect, similar to what you see in the lady's dress, and use watercolours to do so!

After I transfered my template onto watercolour paper and sketched out my design I began applying my washes. I Started with a pure blue pigment wash, then applied a wash where I had mixed the blue with a small amount of black. On the sky portion of this piece I mixed violet, blue and black to contrast slightly against the water.


Next I applied a very watered-down orange wash to the life preservers.


I then added shadows to the Life Preservers by mixing orange and blue, its complementary colour, to neutralize the orange creating a realistic shadow hue.


After the details were completed I scanned the image into my computer for digital retouching and to add the text.


Finally here you have it! I really love the eery feel to this piece; the calm before the storm. Watercolour is my favourite media so I was really excited to work with it on this :)

Happy weekend. Cheers,
~ Jen


Wednesday 25 January 2012

Weekly Illustration -- Twirl

This week's Illustration Friday word is twirl. Instantly I began imagining pictures of elegant, romantic waltzes with a flutter of motion and emotion. I searched for artists with a style that fit the visions in my head and I came across Bradshaw Crandell. In this piece, the wispy pastel marks in the background make me think of a soft breeze, and they help to highlight the beauty of the woman. I will be using chalk pastels in this next piece to create the soft feel of movement.


The concepts for this piece popped into my head like rapid fire. Luckily my hand was fast enough to capture them. I really like the font style I created in the 4th thumbnail, but I think the layouts in the 6th and 7th thumbnails are better.


I've decided to pursue the concept in the 6th thumbnail, and to begin I made a linear draft on regular bond/printer paper. After I did that I transferred that image onto watercolour paper by rubbing graphite on the back of the bond paper then tracing my image on top of the watercolour paper. It's like making a carbon-copy when signing documents.


Next, for the background I made a light watercolour wash using browns and greens.
Using my linear draft as a guide, I began applying colour with my chalk pastels. Most of the blending I did with my fingers, but for the tight spots I enlisted the help of a Q-Tip cotton swab. 


Now that the pastel is down I need a way to keep it from smudging. There are special coating sprays that you can purchase from art supply stores, but I've learned there is also a much more cost efficient solution...Hairspray!!
To add the title of the 'CD' I use Adobe InDesign CS5, but before I do that I need to do some colour correcting to my scanned image. Often when you scan an image you get some colour casting. Also if there is anything on the scanner bed (My brother's dog gets hair everywhere) this will be transferred to your image so it needs to be removed. Here is a before and after image from its original state to its edited state.
Finally I put the image in 'frames' in InDesign which cleans up the edges, and I add text using the Type-On-A-Path tool furthering the feel of movement.
This was another really fun illustration. I'm loving that I can use a different medium each time, and that I can work with my hands instead of relying on the computer alone. 
Until next week, Cheers,
~Jen

Wednesday 18 January 2012

Word of the Week, 'Prepare' -- Illustration

Another week has come and now we are already half way through it! Time certainly does fly when your having fun. Another week means another Illustration, and this week the word is Prepare. I started the process again by researching other artists, exploring the meaning of the word, and brainstorming a series of concepts.

The artist I chose to look at this week is Charles Harper. This image of a Sunfish has a childlike feel but was masterfully done. I want to generate the same feel for my illustration.
After exploring the different meanings/ scenarios where 'prepare' might be used, I 
generated these concepts. A couple of my thoughts were; 'prepare' a meal, 'prepare' for school (packing a backpack), 'prepare' for winter (a person  bundled up to the 9's and a foot deep in the snow), 'prepare' a wall for painting, 'prepare' the ice for skating (tribute our nation with the Zamboni), and to 'prepare' to run in a race.


Now that I've chosen a concept ('Prepare' for winter -- Hamilton finally has some snow!) I've made a linear draft.
Next step; Colour Harmony. Got my trusty Colour Wheel here with me :) I'm going to go with an analogous scheme; blues, blue-violets, violets, red-violets, and reds.


To add the colour I'm going to work with pencil crayons.


Making sure I get those little details exactly right!


I also wanted to have a texture in this piece (I'm always a fan of texture) so I coloured on top of a piece of heavy-toothed watercolour paper. This gave my illustration a texture that makes it look like it's snowing in the scene.


Now I'll add ink to incorporate the great use of lines that Charlie Harper has in his Sunfish illustration.


Add text, and...Voila! "Unknown Artist's latest album 'Prepare'. Coming to Stores this February!"
(Not actually on a CD, but that would be awesome!)

I hope your enjoying these posts; they're a lot of fun to do! I'll have another one for you next week.
Cheers,
~ Jen

Monday 16 January 2012

International Women's Day Poster -- Caryn Tilstra

January 16

Good Monday Morning! I hope you all have a had a wonderful weekend!

We are getting started this week with another great project. I will be generating a poster for International Women's Day. Each week I will update you with my progress on this piece.

My concept will revolve around a portrait of my older sister. She is an inspiration to me everyday. She's always been there for me, even when I didn't think I needed her :) She is a teacher with a passion for her students that surpasses many others! I love her so much, and hope to communicate all of this in my work.

An artist that has inspired me for this project is Al Parker. Here are a few examples of his work:

Now for my concept stage...here are my thumbnails. The concept I am going to proceed with is the left sketch from the set of 2 thumbnails.

This is the reference photo of my sister that I am going to use as the main portrait.

Before I move on to painting or even a rough sketch to size, I want o have a plan for when i add colour to my piece. I've explore a few colour schemes and have decided to go along with the last one I tried. Seen here in the bottom right corner. The mainly earthy tones contrasted with the airy blue captures my sister's personality! Also the blue goes along with the wedding portrait; "Something old, something new. Something borrowed, something BLUE!"


January 19

This is the rough sketch I made as a trial run as well as a guide fro when I begin painting. Sorry about the quality of the image, the size I made it is too big for my scanner and my camera is apparently broken.
January 23
It was pointed out to me that this piece needs some visual tension to make it more eye-catching. I've created some thumbnails of concepts that I feel fix this problem quite well! Caryn is a History and english teacher, so I've chosen to place some giant books in the background. They will be different shades of brown and be simple blocks of colour so as not to distract from the portraits, but rather enhance the overall composition.

January 26

And the painting begins! I started by laying down a few coats of  Gesso as a primer on my masonite board. Next I went over the board with a peach/flesh-tone colour as my base. After that I drew out my elements.

January 30

From there I began really painting. First with the books in the background; not worrying about details at this point.
Then on to the wedding dress and the text areas. It's always best to work with the big areas of colour first and work your way smaller.


January 31, 2012

While I was looking for inspiration pieces for my Illustration Friday work, I came across these images by Walter Wyles. I'm hoping that I can use these as reference to get the texture of my sister's hair more life-like.


Now for more painting! :D Smock, paint clothes, easel, brushes, water and acrylics? Yup, I'm good to go!
Working on smaller blocks of colour.
Applying a second coat to the title.


Now let's take a step back and have a look at cha'!


February 5 (Superbowl Sunday!!!)

I've begun adding shading on the skin tones.
I also did another white coat on the fabric around the bouquet as well as stems to the flowers.


February 6

Still making progress. Today I've been adding smaller and smaller details to this piece. Starting, specifically, with the eyes and other facial features. I've also defined the petals of the flowers in the bouquet.


Next I started working on my sister's vail. I used the dry-brush technique for the most part to create the mesh texture.


And finally I incorporated the blue hue of 'SISTER' and the bottom text bar into the bouquet and the textbook my sister's second portrait is holding to carry the entire colour harmony through the whole poster.


February 13

Continuing with details and colour distribution, I've added yellow bands/labels to the books to spread the yellow around the composition.


To add subtle shadows and highlights to elements in the piece I've decided to use coloured pencil in some areas.


I'm getting closer and closer to the final product! I've really enjoyed the journey so far and have surprised my self a few times as well ;)

February 16


The painting is complete and on Tuesday this week I did my copy photography for it [It was too large for an average scanner so I had to take high-quality photos of it instead].
I've added title text, begun colour retouches and enhancements, and I also added floral print to the background.

The last step was to add a brief description of Caryn and then get the file ready for printing!
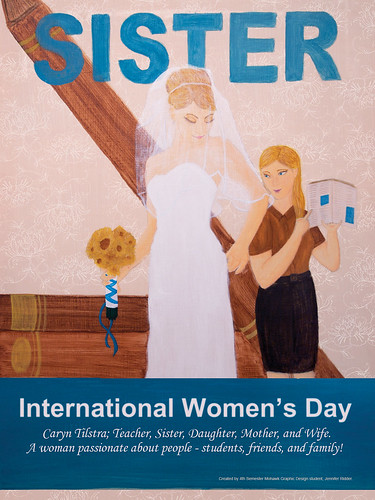
Ta Da -- The final is complete! This poster will be entered in a contest to be showcased on a Cable 12 International Women's Day special; Click here to go to link. I'd appreciate your vote :)

Step O_IWD_Digital Poster_RidderJ
We did it -- I won! One day this week I'll go in for an interview for the International Women's Day special! :) Thank you to all of you who voted for me! I really appreciate it!